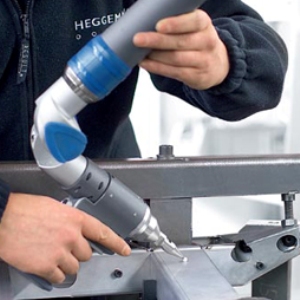
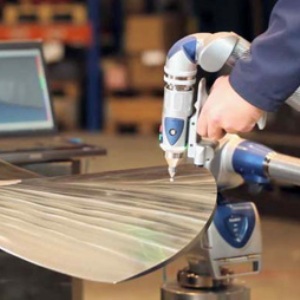
Tool building and injection moulding within the automotive, aerospace, andshipbuilding industries require a high degree of accuracy and repeatability.FARO’s laser tracker and measuring arm are portable CMMs which can perform full volumetric accuracy tests on tools and moulds to ensure the parts are being manufactured to the highest standard. With these metrology instruments, tool makers can also identify or predict defects by evaluating the dimensional integrity and repeatability of tools and moulds.
Marianna Airmotive Uses a FARO Laser Tracker to Reduce Repair Turnaround Time dramatically
“The FARO Laser Tracker’s ability to provide real-time measurements directly against the CAD data enables engineers to instantly visualize deviations from the nominal. The Tracker has dramatically reduced the time required to certify large parts, tooling and machinery while also resulting in substantial quality improvements.”
For almost 20 years, Marianna Airmotive Corporation (MAC) has been repairing and overhauling structural components for the Air Force’s largest aircraft, the C5 Galaxy. As typical for most repair facilities, Marianna does not have access to the aircraft itself so it must build and certify fixtures that it can use to assemble and fabricate structural components to tight tolerances. “The FARO Laser Tracker’s ability to provide realtime measurements directly against the CAD data enables engineers to instantly visualize deviations from the nominal,” said Bill Visage, an engineer associated with Marianna Airmotive. “It has dramatically reduced the time required to certify large parts, tooling and machinery while also resulting in substantial quality improvements.”
Aircraft repair challenges
Among the largest aircraft in the world, the Lockheed C-5 Galaxy is a military transport designed to carry outsized and oversized cargo over intercontinental distances. The first C-5 was delivered to the Air Force in 1968 and production ended when the 131st aircraft was delivered in 1989. The C5 features a cargo compartment that is 19 feet wide, 13.5 feet high, and 121 feet long, slightly longer than the length of the first powered flight by the Wright Brothers. The C5 is basically an aluminum skin and honeycomb core structure. Marianna’s contract includes repairing all significant C-5 structural components that are removable from the aircraft such as the main landing gear door, aft cargo door, spoilers, inlet cowls, slats, flaps, and radomes. For example, ground spoilers are deployed on landing to enhance wheel braking. Flight spoilers are used for specific flight maneuvers. Ground and flight spoilers are bonded panels with multiple hinges. The hinges need to line up to the aircraft wing mating points precisely with accuracy on the order of +/- 0.010 inch. “The reattachment of the hinges needs to be done very accurately,” said Ryan Harvey, Engineer for Marianna Airmotive.
Before obtaining the FARO Laser Tracker, MAC Engineers used the CAD model to create a series of 2D templates to insure a repair/overhaul did not affect the contour of the part. But each template inspects only a single crosssection so this method is not practical for inspecting a large contoured surface as is required for a more comprehensive repair/overhaul. Another problem is that it is nearly impossible to accurately set up each template in relation to the others. Twist that results when a template is tilted in relation to its theoretical angle can cause the part to be out of specifications even when the template matches the cross-section perfectly. “MAC decided to carefully build, inspect and certify tooling that enables our mechanics to relatively easily meet the customer’s dimensional tolerance and fit requirements,” Harvey continued. Bond tools are used to lay up the skins and cores. The skins and cores are combined with an adhesive and cooked in an oven or autoclave. Vacuum or pressure is applied to form an integrated structure. The bond tool insures the part contour is maintained. After curing the bonded structure it is moved to an assembly tool designed to ensure accurate alignment of frames and fittings. Obviously, the accuracy of each tool is critical to the integrity of the repair/overhaul process.
Need to measure and calibrate tools
“We needed a tool to measure and calibrate these tools,” Visage said. Marianna selected the FaroArm, a measuring arm that is comparable in function and accuracy to large fixed-bed coordinate measuring machines (CMMs), but is portable and easier to use. The fixtures have stanchion points that align to the hinges to check their position. Marianna mechanics initially used the FaroArm to check the stanchion points against the drawings. From there, Marianna expanded the use of the FaroArm to other fixture/tools, such as that used to assemble the wing tip. But, before long the company needed to perform even more detailed measurement on much larger parts. “The rear cargo door of the C5 is 15 feet wide by 40 feet long,” Harvey said. “We could inspect it with the FaroArm but we would have to leapfrog, in other words change the position of the FaroArm, several times in order to inspect the entire perimeter. This would take a considerable amount of extra time and raise the potential for inaccuracies. We asked FARO if they could provide an alternative and they demonstrated the Laser Tracker.”
The FARO Laser Tracker mounts on a tripod and emits a laser that is reflected off a retroreflective target positioned at the point to be measured. The laser then retraces its outward path back to the Laser Tracker. Two angle encoders measure the elevation and rotational angles of the light while a distance meter is used to determine the 3D position of the retroreflector. The operator moves the target and the Laser Tracker measures the distance and angle of each point. In the traditional incremental distance measurement approach, the operator is required to place the target in the tracker’s home position and then, while the laser tracks along, moves the target to the position to be measured while an interferometer measures distance. If the beam is broken, the measurement is not valid and the measurement process must begin from scratch. FARO’s XtremeADM overcomes these line of sight issues. If a person or object comes between the laser beam and the SMR (spherically mounted retroreflector) target, the user can relocate the beam and continue measuring, without backtracking. This feature also eliminates the need for an interferometer to measure distance, reducing system cost while allowing the user to perform all measurements in a single mode – rather than having to switch between multiple modes.
Measuring deviation from CAD model in real time
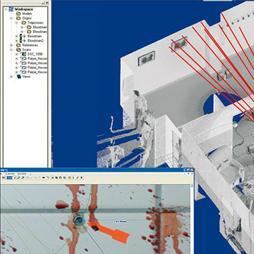
Marianna purchased the Laser Tracker along with Verisurf software to perform best fit alignments of surface data with a CAD model. For example, if the part is tilted the software tilts the CAD model to match it. After the model and part are aligned, the software then determines the deviation of each measured point from the CAD model. The results are provided in real time while the measurements are being taken. So if there is a problem with a part or fixture, the operator does not waste any time completing the inspection, but rather can abort the inspection as soon as they understand the problem and can then begin making corrections. The tracker can achieve 0.025 mm (0.001 inch) accuracy.
Marianna now uses the FaroArm to inspect smaller fixtures and parts and the Laser Tracker to inspect larger fixtures and parts. It takes about an hour to inspect a small fixture such as a bond tool for a spoiler and three to four hours to inspect a larger fixture such as an assembly tool for the rear cargo door. This includes checking the location of the points to be measured, booting up the computer and loading the software, starting the Laser Tracker, positioning the target, picking points on the CAD model to align with the target and finally measuring the points. “The Laser Tracker is used for all parts over 12 feet in length and has vastly improved our capability to repair components,” Visage said. “It is used to inspect surfaces for outer skin defects, indicate points where the skins are out of contour, and can perform reverse engineering by creating a 3D CAD models based on the measured points. Measuring directly against the CAD data allows the engineer to see real time deviations from the nominal. This allows parts to be produced with an inspection report certifying that it has been machined within acceptable tolerances. The addition of these measurement devices have enabled Marianna to improve our quality and reduce costly time spent on off-site purchases. Turnaround time has been reduced from weeks to days.”
About Marianna Airmotive
For almost 20 years, Marianna Airmotive (www.mariannaairmotive.com) has been proud to be a leader in overhaul, repair, and remanufacturing of structural components for the Air Force’s largest aircraft, the C5 Galaxy. In addition, MAC continues to pursue and complete contracts pertaining to sheet metal and bonding work for a variety of aircraft and aircraft components. With a top-notch workforce, a large modern facility, and a focus on excellence, it achieves a high level of technical capability that promotes the principles of quality precision, attention to detail, well-defined processes, and thorough documentation. With ongoing initiatives and improvements, Marianna Airmotive continually strives to deliver the best quality possible.


